Sir,
Could you please do a shoot with me?
Sure Ma’m. The honour is mine.
– Elisa –
Canon 5D II with Sigma 50 mm f1.4 DG A. 1/30s f2.8 ISO400
a first part of a shoot I did recently with Justine. We worked together earlier, this was our third meet. Things went smooth and the weather was fine. Some splendid images in this shoot, more to come.
Thank you Justine, for this fine morning.
Images with Canon EF 135mm f2 L (standing against the wall) and Sigma 50mm f1.4 DG A.
thank you for watching,
ludwig
Hello there,
some nice days in september allowed for some extra outdoor work.
the atmosphere in the garden was nice, the model was feeling good and relaxed. We spent some time here enjoying the sun an warm weather. The most difficult thing to tackle are the bright highlights. It is almost impossible not to wash out the highlights if you want some decent light in the shadow area’s. thats why it is actually much easier to shoot in a softly clouded sky situation than with bright light. Exposing for the bright highlights will give you near black shadows, exposing for the shadows will give you over-exposed hightlights.
I do not have an assistant with a sun-washer filter, so I often will shoot in a back-lit situation, with some highlight clipping in the bright area’s, and a lot of fill light in post processing. An alternative is seeking for the cover of a leaf tree, as we did in some images.
Elisabeth did great. Thank you. I hope you like the images.
Except last two (50mm Sigma) all images with Canon 135 mm f2.0 at f2.5
Hi,
Another example of a Lightroom development process.
Two stages of LR development, and in this image I added a bit of photoshop sparks.
Oh my, bad exposure in the first place. Working against bright light has an imminent danger: blowing out the highlights. That’s why I will be very careful not to over-expose. I had my model standing in the tree shade, but depending on her position, the sun would shine on her blonde hair from time to time. Be careful not to cram it! Original image: 1/500s f2.2 ISO 100 with the Canon 135mm f2 L lens.
I first had developed the whole series as the second image:
if you have lightroom:
exposure +0,70
contrast +19
highlights -67
shadows +55
and a vignette darkening the corners.
I also added an extra +0,28 exposure on the face and breast area. (radial gradient)
After that I decided that I wanted to get some more warmth and glow to the images, so I went a step further (still LR)
I changed the white balance from as shot 5400/-2 to a slightly warmer 5847/-3
I pushed up the exposure to +1,05 stops.
This gave me a warmer tone, and a radiating model.
In photoshop I did two further things:
I added a sort of soft-focus filter to the image (layer copy with gaussian blurr on top of the originallayer, blending mode set to screen, with reduced opacity. Prevent the soft focus layer from covering the focus areas of your image – head, breast, hands – )
Add a combined unsharp mask/high pass sharpening layer to the ‘focus areas’.
Sharon – Reina Petita Belgica – Reina Intercontinental – Costa Rica
Hi,
I enjoyed working in my new location the last couple of weeks. It is spacious, very quiet and private, it has a lot of windows, and a large amount of possibilities for different shooting environments. Unfortunately the summer is swiftly passing away, and with the colder days coming in, models probably are going to get goose-bumps again. Difficult to retouch, not pleasant for the model.
That is what I’m missing the most in our Belgian climate. Rather than being half summer half winter, we only have 2 months of summer, the rest of the year is half fall half winter.
I had two shoots last Friday, you should get images from them very soon. This one is from earlier this summer.
Enjoy 🙂
1/50s f2.0 ISO 320
Canon 5D II with Sigma 50 mm
come again soon,
ludwig
For those who missed my latest exhibit at Gafodi Gavere, I have published the entire exhibit on my page ‘limited edition prints’ on this site. Go and Check it out.
Believe me, they are better in real life, but this may give you a good idea. 😉
see you soon,
Ludwig
Long legs, high heels.
Sharon came to me for a shoot for her ‘Miss Universal’ – edit: ‘Reina Intercontinental’ – election in Costa Rica.
She’s not new to me. I worked with her before, here, here and here.
We did several clothing outfits, one even more ‘missy’ than another, not really my style as you probably know by now, but I found this image rather sexy at least.
You can express your support for Sharon here: FB page
thank you for watching,
Ludwig
I’m happy to say that after having to quit ‘the mansion’ I finally have found a new ‘homebase’ for shooting. Totally different in character, but as much variation possible as the mansion. Not sure what to call it yet. This will be my main location for at least a couple of months. I already posted some images taken there, but there’s more to come.
A ‘standard’ available location is a good thing for the ease of mind, for the ease of organisation and the fine-tuning of techniques and setups.
It is however important to keep on working in different locations, to expand your portfolio, get some variation and push yourself to be creative. For that I would like to call on followers that if you have a location near my hometown (Ronse – B) that I can use, to please give me a sign. I probably will come over only in a while, but it is handy for me to have a basic list of possible locations for shoots. I can always pick another one if the moment doesn’t suit you.
This said, please enjoy this image from this summer: Hot summer days – the sequel
natural light in an extremely dark depot.
1/60s f2.8 ISO250 – Canon EF 100mm f2.8L Macro IS
thank you for watching
Ludwig
Some images from a while ago. Analog takes a little longer to process than digital. 🙂
Very hard circumstances for making pictures without a built-in light meter, with the light changing every minute. Sunny with scattered clouds. Luckily the film I use has a lot of ‘range’, so I could correct in scanning, when needed.
I enjoyed working in this castle environment very much. If any one of my followers out there owns his or her private castle, and I could use it for shoots, please shout. I will grant you my eternal gratitude and a free beer.
I think these are the last images from the ‘interim model’, I hereby want to thank her again for stepping up for this life-changing experience.
thank you my dear audience for reading this post. 😉
ludwig
From a recent shoot. I have made similar images in my – Nude Incognito – series, in a black studio and with the use of flash lights. This is in a naturally lit environment. I especially like how the body shape and pose fills the square format. Also the dense structure of the floor in contrast with the soft shiny structures of the skin are appealing to me. The model had just put on a body lotion, giving some extra shine to the skin.
I hope you like it. I did, as well as my model and her partner.
Canon 5D mark II with Sigma 50 mm f1.4 DG A.
1/40s. f3.2 ISO 200
come again soon.
Ludwig
I think you know Pauline by now. I love working with her. She’s nice, beautiful, she can be herself or she can put on a role, she’s punctual and joyful. I noticed I never published a color image from this shoot. It’s a shame, because they came out good in color too. Enjoy:
Images taken with Canon 5D mark II and Sigma 50 mm 1.4 (first image) and Canon 100 mm 2.8 Macro. – All available light.
thank you for visiting,
Ludwig
When I have some more time on a photoshoot, I shoot some images on film too.
One of the rolls of film I’ve shot with Ivana never got published here. It’s a shame, since I think the images are worthwhile. I had been working hard to see the ‘real’ Ivana, not the model, read these posts to know all about it:
in this third part, I also shot some film images. A roll of TMax 400 film on Rolleiflex 75 mm f3.5 6×6 format.
happy viewing.
See you again soon
Ludwig
Last Friday I had a model expressing her feelings about her artistic nude shoot as such:
‘Every woman should do this at least once in her life. The images from the first shoot (which was a non nude beauty shoot) have given me enough confidence to do this, and this is such an empowering experience on the level of self-esteem and self consciousness that I would encourage everyone to do it.’ She took a lot of business cards. 😀
Body-language is a very important exteriorising of ones self-awareness, self confidence and self esteem. People with hanging and forward pushing shoulders are mostly the less confident ones, they have tendency to bend over to hide and protect themselves from the outer world. They are having a hard time opening up in a photoshoot. I received another testimonial where a woman said ‘I found it a very fine experience, but at the same time I was very much confronted with my vulnerability, my low self esteem and my lack of confidence. You’ll probably see that in the images. I’m very happy I made this step, but I sure have a long way ahead of me.’
On another occasion I have had my model shout out loud in the open forest ‘I am open to the world, to its resources and its wealth, and I’ll give my talents, my beauty and my smile in return’. And I made some images she’ll never forget. I have given her the task to do that exercise on a regular base. When I sent her the first images she thanked me a lot, and told me she would use them for her daily exercise.
I have strong belief that by changing the body-language, even if it was only one time, making some ever lasting images of it, can change a persons vision on who she (or he) is, and more important, who she can be. In that aspect the role of the photographer becomes so much more than the one taking pictures, being able to handle light, exposure, lenses and camera’s. He has to be some kind of a therapist, being able to express comfort and thrust to his model, being able to understand feelings, emotions and personal barriers. He has to be able to pauze and give space when needed, work fast when the process allows. Learning photography is not a hard thing to do, learning peoples psyche is.
for reasons of privacy I choose not to publish any pictures with this post, except the two nameplates that are upon our front door. They match very well indeed.
thank you for reading, comment and share as much as you like.
if you feel like posing could do you good, please give me a sign. If you feel you need some other kind of therapy, contact Nathalie. 😉
Ludwig
Natacha is into running, no, she loves running … up to 50 kms is ok she told me. I think I’d die.
Her body shows the training and exercise efforts.
I have tried to combine that with some sensuality, and strong personality.
All natural light, Canon 5D II and 50mm/100mm/17-40mm lenses.
thank you for watching, leave a comment if you like.
Ludwig
Single image post.
People who’ve seen my exhibition in Gavere (about 850 of you) have seen this image ‘real life’.
Because it relates so well with the current weather here in Belgium and Europe, … free for all.
Sunburst.
Canon 5D II with Canon 17-40mm f4.0
1/60s – f11 – ISO100 – 39mm
thank you for watching,
ludwig
Some of my former students asked me if I could try to find out about a particular developing effect she was after, she sent me some sample images and a bit of an explanation what she needed. I tried to figure out what could be done only with the use of Adobe Lightroom ®, I’m currently using version CC 2014. I looked for an interesting image in one of my earlier shoots and found one from this shoot: A very good morning – Jenn at house Adelaïde NSFW  The image was rather dark exposed – blame on me. First things first: up with exposure + 1 stop. As I had seen in the sample images, the blacks were not really black anymore, and the highlights were really pale. I wanted to keep the background as dark as possible, so I changed general settings like this: Exp: +1 Highlights: +100 Shadows: -100 Blacks: -42
  A little harsh maybe :p lots of contrast, but not really appealing to me. to get a more snappy image, and to start trying to find that ‘washed out’ look, I further changed: Clarity: +25 Saturation: -14
  Then I added four local adjustment brushes, below are the respective masks 1 to 4: 1: The background: Exposure -0,8 stop, to get back to the original dark background (I could have done it the inverse way, and only have painted the model in stead of upping the exposure 1 stop overall.) 2: Skin to get it warmer and softer: Exposure +0,48, Clarity -70, Temp +7 3: Hair, and below eyebrows, to get more lively hair: Exposure 0,46, clarity 30 4: Pull over arm and leg, because I thought the arm was getting a lot of attention: Exposure -0,67
  This is the resulting image after the local adjustments.
  As all of the images had non black blacks, and a slight blue’ish color cast, I used the tone curve for further adjustment, where I changed to linear curve, I upped the left lower point for RGB, and I separately upped the left lower point for blue. (The left lower point are your blacks, by upping them, you make your blacks very dark grays, by separately upping the blue some more, you ad a blue color cast, especially in the blacks)
 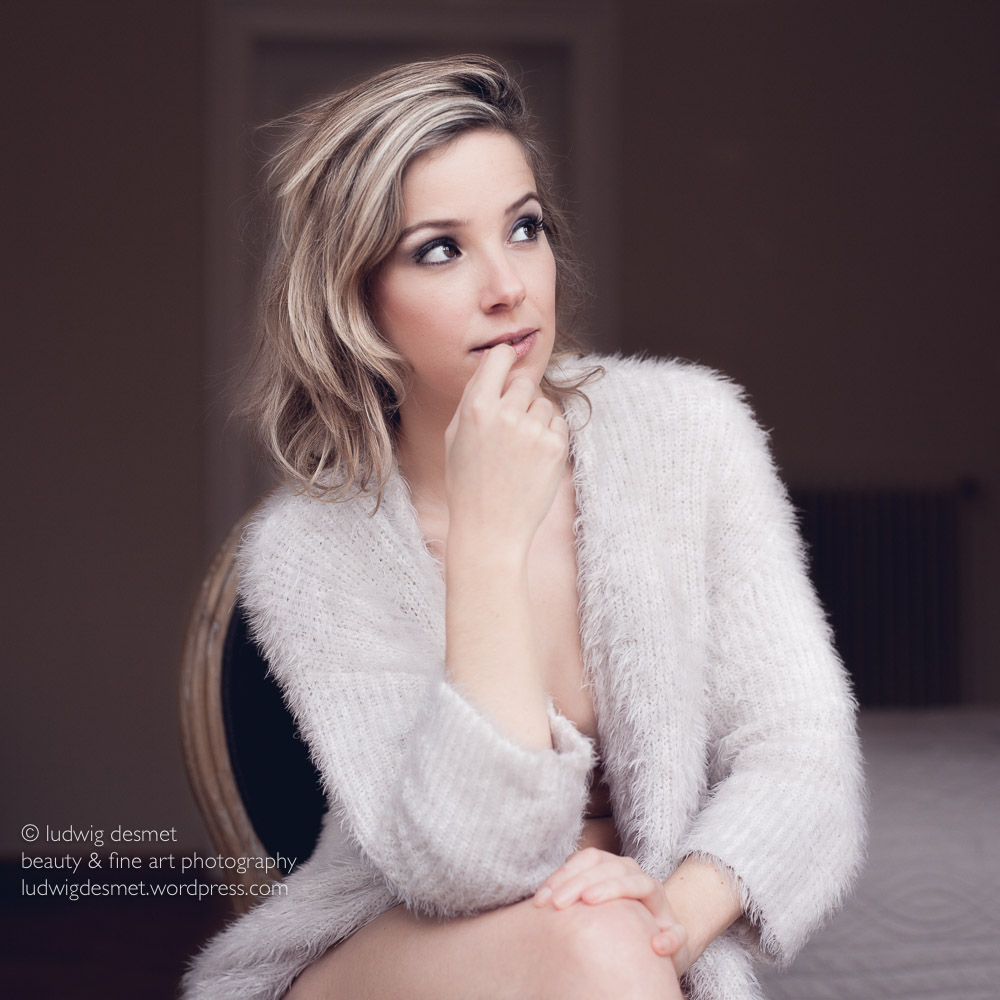 but I wanted some more, so I added a split toning effect in the shadow channel: Hue 244, saturation 15
 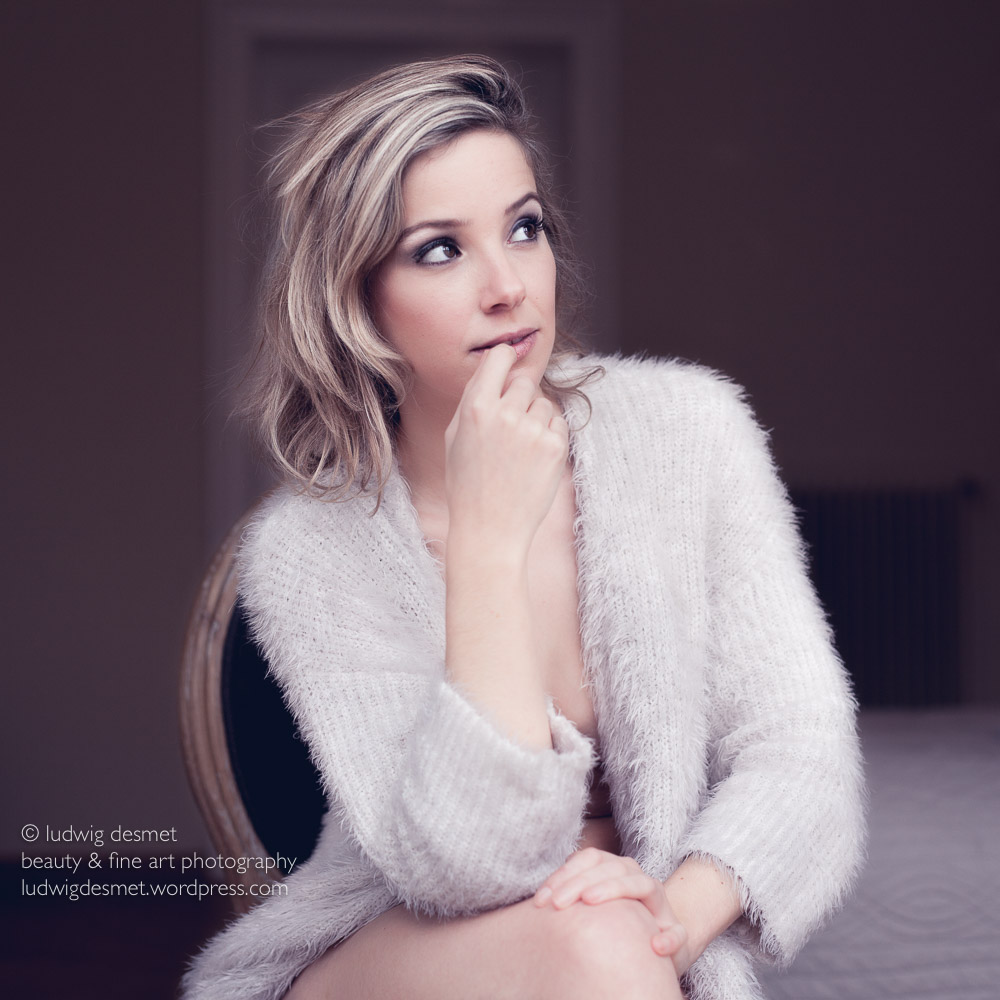 after that, some vignetting, sharpening and a little correction here and there, the final image:
 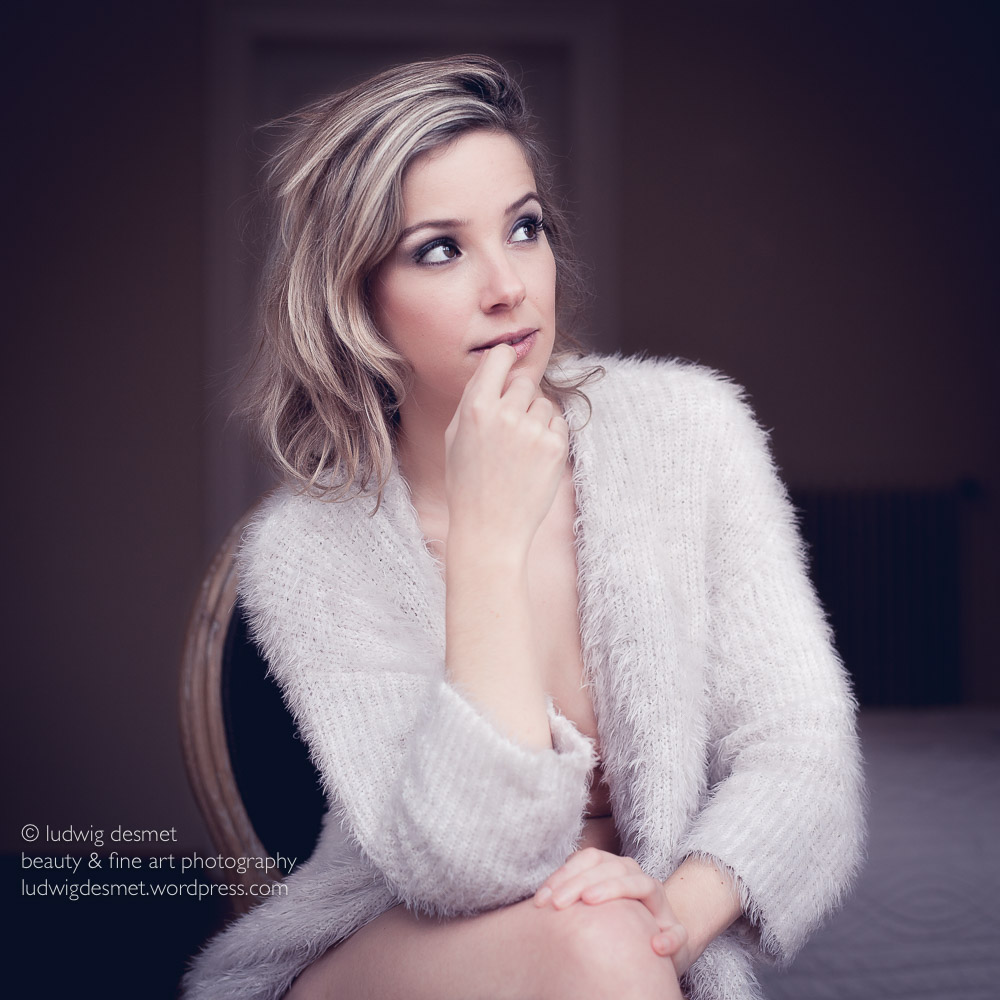 and a small before and after image for your convenience:
 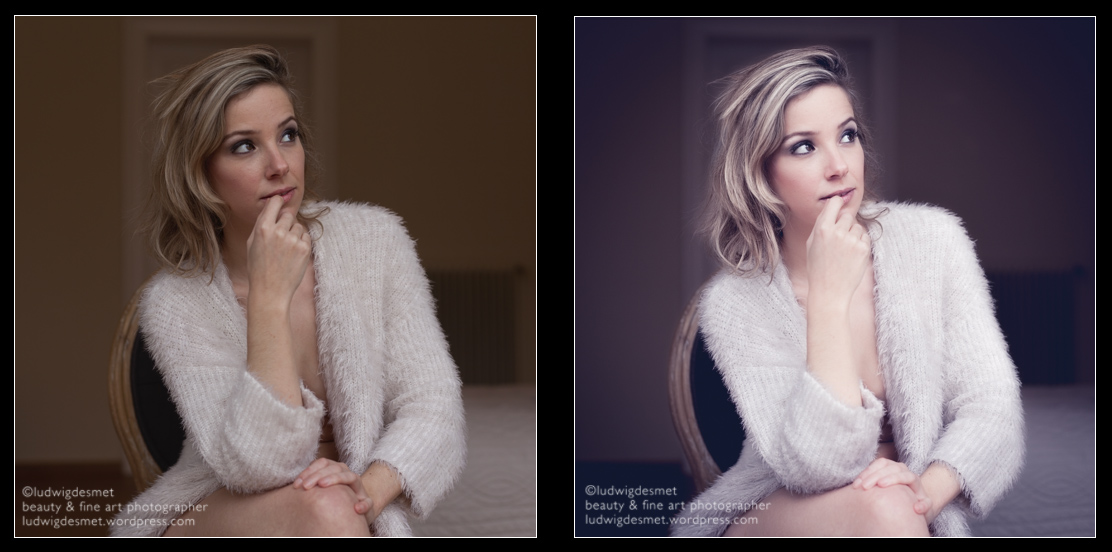 If you found this step by step developing instructions interesting, you might also like these posts: Kimberly before and after Developing beauty LR4 thank you for watching, I hope this has been inspiring to you.
ludwig
Nice environment, nice weather, nice model, …
first time in this place, and as I tend to not prepare so much for a shoot it is always a search for an approach. This place has tons of possibilities, …
Eline was worried about her figure, as a lot of women do. I’m happy that I have been able to surprise her with some eye-dropping images. What do you think?
All images Canon 5D II with sigma 50 mm f1.4 or Canon 135mm f2.0.
thank you for watching,
ludwig desmet
A single image from this same shoot (interim model/the engine Room) – in the afternoon we went to this nice little castle up the hills in Ronse. We could freely use the exterior and surroundings of the castle. A great new location. judge for yourself:
Image taken with Rolleiflex 75 mm Tessar f3.5, on Kodak Tmax400
soon more on this blog
thank you for watching
ludwig
the engine room again.
it has beautiful soft light, coming from three sides (left and right up in the wall are windows over the entire length of the room and then the big round shaped window, here facing the model). I rarely use ISO’s higher than 400, but sometimes it gives a little more comfort and ease of use for playing with aperture, and making sure that there’s no camera shake in the images.
1/80s f3.2 ISO500 Canon 5D II with Sigma 50mm f1.4 DG A
thank you for visiting,
ludwig